How to Clean a Commercial Air Fryer
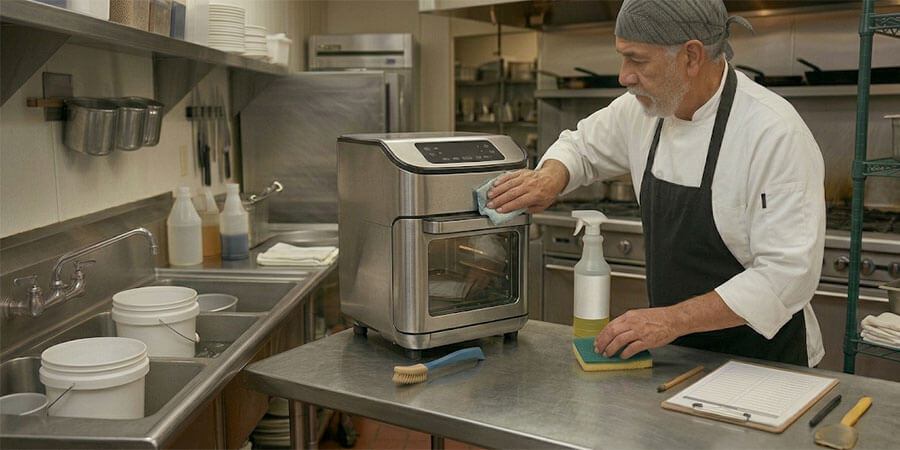
Table of Contents
Daily quick-clean routines, deep cleaning methods, and maintenance practices that keep your air fryer safe and efficient
Commercial air fryers handle heavy workloads - high temperatures, constant grease exposure, and back-to-back cooking cycles throughout every service. Without consistent cleaning, grease builds up on heating elements, airflow vents, and basket surfaces, which reduces cooking performance, creates food safety risks, and shortens equipment life.
The good news is that air fryer cleaning is straightforward once you have a routine. A daily quick clean takes less than 15 minutes at closing, and a weekly deep clean keeps the unit running at peak performance. The key is consistency - a fryer that gets cleaned every day rarely needs the kind of aggressive scrubbing that damages surfaces and wears out components.
Why Cleaning Your Air Fryer Matters More Than You Think
A dirty air fryer does not just look bad. It actively works against you in ways that cost time and money.
| Problem: | What Causes It: | How It Affects Your Kitchen: |
| Uneven cooking | Grease buildup on heating elements restricts airflow | Food comes out undercooked on one side and overcooked on the other |
| Smoke during operation | Carbonized grease and food debris on interior surfaces | Smoke alarms, unpleasant taste transfer to food, staff discomfort |
| Longer cook times | Reduced heat transfer from coated elements | Tickets take longer, line backs up during rush |
| Cross-contamination risk | Old food residue and grease harbor bacteria | Health code violations and foodborne illness risk |
| Equipment failure | Grease accumulation overworks fans and heating elements | Premature motor burnout and costly repairs or replacement |
| Failed health inspections | Visible grease buildup and unsanitary conditions | Citations, fines, or temporary closure |
The FDA Food Code requires all food contact surfaces to be cleaned and sanitized after each use. Air fryer baskets and trays are food contact surfaces - skipping the cleaning step is not just bad practice, it is a health code violation.
Daily Quick-Clean Routine (After Every Shift)
A daily quick clean prevents grease from hardening into the kind of buildup that requires aggressive scrubbing later. This routine should happen at the end of every shift - or more frequently in high-volume operations.
Step 1 - Power down and cool safely. Turn off and unplug the air fryer. Allow it to cool until components can be handled safely but are still slightly warm - warm grease wipes off more easily than cold, hardened grease.
Step 2 - Remove all detachable parts. Pull out cooking baskets, drip trays, racks, and any removable panels. Most commercial units have at least three removable components. If your unit has multiple basket levels, remove each one.
Step 3 - Brush off loose debris. Use a soft-bristle brush or brass-bristle brush to sweep crumbs and loose food particles from all surfaces - baskets, trays, interior walls, and around the heating element. Work from top to bottom so debris falls down and out.
Step 4 - Wipe interior surfaces. Dampen a clean cloth or paper towel with warm water and a small amount of food-safe degreaser. Wipe the interior walls, ceiling, and floor of the cooking chamber. Pay extra attention to the area directly around the heating element where grease vapor condenses.
Step 5 - Wash removable parts. Wash baskets, trays, and racks in a three-compartment sink using the standard wash-rinse-sanitize cycle. Use a non-abrasive scrub pad to remove any stuck-on residue. Avoid steel wool or abrasive scouring pads on coated surfaces - they strip the non-stick coating and create places for grease to accumulate.
Step 6 - Dry and reassemble. Air dry all components completely or pat dry with clean towels. Moisture left on metal parts promotes corrosion. Reassemble the unit and leave the basket slightly ajar to allow airflow and prevent trapped moisture.
Keeping the right janitorial supplies stocked - food-safe degreasers, non-abrasive scrub pads, and sanitizer - makes the daily routine faster and more consistent.
Weekly Deep Cleaning Method
Deep cleaning goes beyond daily maintenance to address grease that accumulates in places the daily routine does not fully reach - behind heating elements, inside ventilation channels, on fan guards, and in drip tray recesses.
Before you start: Photograph the interior before disassembly if this is your first deep clean on a particular unit. This makes reassembly easier and helps you identify components you may have missed.
Full Disassembly
Remove everything that detaches: baskets, trays, racks, drip pans, removable panels, and any guards or screens over the fan or heating element. Consult your owner's manual for your specific unit - some components require tools to remove, and forcing parts that are not designed to detach can cause damage.
Soak Removable Parts
Fill a sink or bus tub with hot water and a food-safe commercial degreaser mixed to the manufacturer's recommended concentration. Submerge all removable metal parts and let them soak for 15 to 30 minutes. For heavy buildup, extend the soak time - but do not soak overnight, as prolonged exposure to some degreasers can discolor or damage certain metals.
Clean the Heating Element
The heating element is the most critical and most neglected surface in an air fryer. Grease buildup on the element reduces heat output, causes smoke, and can eventually become a fire hazard.
- Use a soft-bristle brush to gently loosen carbonized grease from the element. Never use metal tools or abrasive pads on heating elements - they can damage the element coating and create electrical hazards.
- Wipe with a damp cloth dipped in degreaser. Do not spray liquid directly onto the element or any electrical connections.
- For stubborn buildup, apply a paste of baking soda and water to the element, let it sit for 10 minutes, then wipe clean with a damp cloth.
Scrub Soaked Parts
After soaking, scrub each part with a non-abrasive pad or brush. A brass-bristle brush works well for wire baskets and racks. Clean all surfaces, edges, and corners - grease hides in basket welds and drip tray channels.
Clean the Interior Chamber
Wipe down all interior surfaces with a degreaser-dampened cloth. For stuck-on residue on interior walls, use a plastic bench scraper to loosen it before wiping. Clean the fan guard or screen if accessible. Check the drain or drip channel and clear any blockages.
Rinse, Sanitize, and Reassemble
Rinse all parts thoroughly under clean water to remove degreaser residue. Sanitize all food contact surfaces using your standard sanitizer at the correct concentration. Dry everything completely before reassembling. Run the air fryer empty at operating temperature for 3 to 5 minutes after reassembly to burn off any remaining moisture or cleaning solution residue.
Cleaning Frequency Guide
How often each component needs attention depends on your volume. Use this table as a baseline and adjust based on how heavily you use the unit.
| Component: | Light Use (under 20 cycles/day): | Heavy Use (20+ cycles/day): |
| Baskets and trays | Clean after each shift | Clean after each shift (mid-shift wipe if needed) |
| Drip tray | Empty and wipe daily | Empty and wipe every 2-4 hours |
| Interior walls | Wipe daily | Wipe daily, mid-shift spot clean |
| Heating element | Weekly deep clean | Twice weekly deep clean |
| Fan guard / ventilation | Weekly inspection and wipe | Weekly deep clean |
| Exterior surfaces | Daily wipe | Daily wipe |
| Full deep clean | Weekly | Twice weekly |
High-volume operations that run air fryers continuously should consider a mid-shift basket swap - pull dirty baskets for soaking while rotating in clean ones. This keeps cook quality consistent without stopping production.
Cleaning Products and Tools That Work
Not every cleaning product is safe for commercial air fryers. The wrong product can damage non-stick coatings, corrode metal surfaces, or leave chemical residue that transfers to food.
What to use:
- Food-safe commercial degreaser - The most important product in your air fryer cleaning kit. Choose a degreaser rated for commercial kitchen use that rinses clean without residue. Always follow the manufacturer's dilution ratio.
- Non-abrasive scrub pads - For coated baskets, interior walls, and any surface with a non-stick finish.
- Brass-bristle brush - Safe for wire baskets, racks, and uncoated metal surfaces. Effective at loosening carbonized grease without scratching.
- Soft-bristle brush - For the heating element and fan area where gentle cleaning is critical.
- Plastic bench scraper - For loosening baked-on residue from flat surfaces without scratching.
- Baking soda - Mixed into a paste with water, effective for stubborn spots on heating elements.
- Clean microfiber cloths - For wiping and drying. Replace frequently during cleaning.
What to avoid:
- Steel wool or metal scouring pads - Destroys non-stick coatings and scratches surfaces, creating places for grease to bond.
- Oven cleaner - Too harsh for air fryer components. Can damage coatings and leave harmful residue.
- Bleach or chlorine-based cleaners on metal parts - Can corrode and discolor metal surfaces.
- Pressure washers or direct water spray on electrical components - Water intrusion causes electrical damage and safety hazards.
Common Cleaning Mistakes to Avoid
Even kitchens with good cleaning habits make mistakes that reduce equipment life or create safety risks.
| Mistake: | Why It Is a Problem: | What to Do Instead: |
| Cleaning while the unit is still plugged in | Electrical shock risk and water damage to components | Always unplug before any cleaning |
| Using abrasive pads on coated baskets | Strips non-stick coating, creating permanent grease traps | Use non-abrasive pads or brass brushes only |
| Spraying liquid directly on the heating element | Can cause electrical damage or short circuits | Wipe the element with a damp cloth instead |
| Skipping the heating element during cleaning | Grease builds up and becomes a fire hazard over time | Include the element in every deep clean |
| Reassembling while parts are still wet | Promotes corrosion and can cause electrical issues | Dry all parts completely before reassembly |
| Using the wrong degreaser concentration | Too weak leaves grease behind; too strong damages surfaces | Follow the manufacturer's dilution ratio exactly |
| Never checking the fan or ventilation path | Restricted airflow forces the motor to overwork and overheat | Inspect and clean the fan area weekly |
How Proper Cleaning Extends Equipment Life
A commercial air fryer that gets cleaned daily and deep cleaned weekly will significantly outlast one that gets sporadic attention. Grease buildup is the primary cause of premature failure in air fryers - it insulates heating elements (forcing them to work harder), restricts fan airflow (overheating motors), and corrodes metal surfaces over time.
Think of cleaning as preventive maintenance. The 15 minutes you spend at closing each night prevents the kind of damage that leads to a service call or a full replacement. The same principle applies to all your cooking equipment - the maintenance strategies in Deep Fryer Maintenance Tips overlap directly with air fryer care.
If your kitchen also runs traditional deep fryers, the step-by-step cleaning process in How to Clean a Commercial Fryer covers the oil-based cleaning procedures that differ from air fryer maintenance.
For broader food safety practices around equipment cleaning and sanitation, 10 Food Safety Tips for Commercial Kitchens covers the fundamentals that apply across all equipment types.
Frequently Asked Questions
How often should I clean my commercial air fryer?
Clean baskets, trays, and interior surfaces after every shift at minimum. Deep clean the entire unit - including the heating element, fan area, and ventilation paths - at least once a week. High-volume operations running 20 or more cycles per day should deep clean twice weekly.
Can I use oven cleaner on my commercial air fryer?
No. Oven cleaners are too harsh for air fryer components. They can damage non-stick coatings, corrode metal parts, and leave chemical residue that transfers to food. Use a food-safe commercial degreaser instead.
How do I remove baked-on grease from the heating element?
Apply a paste of baking soda and water to the affected area and let it sit for 10 minutes. Then gently wipe it away with a damp cloth. For heavy buildup, use a soft-bristle brush to loosen the residue first. Never use metal tools or abrasive pads on the heating element.
What is the best degreaser for a commercial air fryer?
Use a food-safe commercial degreaser rated for kitchen equipment. The product should rinse clean without leaving residue and should be mixed to the manufacturer's recommended concentration. Avoid household cleaners, which may not be formulated for food contact surfaces.
Do I need to clean the fan inside my air fryer?
Yes. The fan and its surrounding guard accumulate grease over time, which restricts airflow and forces the motor to work harder. Inspect the fan area weekly and wipe it down during your deep clean. A restricted fan is one of the leading causes of premature motor failure in commercial air fryers.
Can I put air fryer baskets in a commercial dishwasher?
Check your owner's manual first. Some commercial air fryer baskets are dishwasher safe, but many have coatings or finishes that degrade in the high heat and harsh detergents of a commercial dishwasher. When in doubt, hand wash using the three-compartment sink method.
How do I prevent grease buildup between deep cleans?
The daily quick-clean routine is your best defense. Wiping the interior and cleaning baskets after every shift prevents grease from hardening. Additionally, emptying the drip tray frequently (every 2 to 4 hours in heavy-use kitchens) stops grease from overflowing and reaching places that are harder to clean.
Related Resources
- Air Fryers - Commercial air fryers for restaurant and foodservice operations
- How to Clean a Commercial Fryer - Step-by-step cleaning guide for traditional deep fryers
- Deep Fryer Maintenance Tips - Preventive maintenance practices for commercial deep fryers
- Janitorial Supplies - Degreasers, sanitizers, and cleaning supplies for commercial kitchens
Share This!