How to Season Cast Iron Cookware
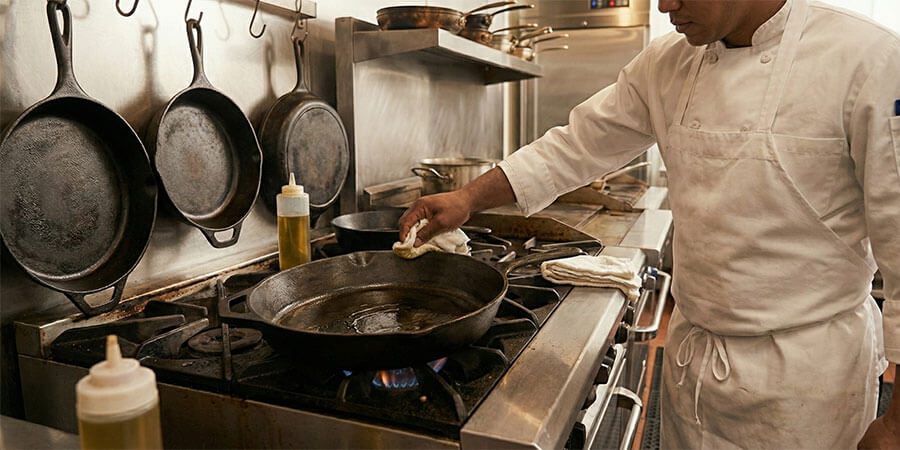
Table of Contents
Step-by-step instructions for seasoning, cleaning, and maintaining cast iron for years of reliable cooking
Seasoning is the process of baking oil onto cast iron to create a natural, nonstick cooking surface. This guide walks through first-time seasoning, daily cleaning methods, restoring rusty pans, and the maintenance schedule that keeps cast iron performing at its best in commercial and home kitchens.
Cast iron cookware has been a kitchen staple for centuries. When properly cared for, a single cast iron skillet can last generations, developing a naturally nonstick surface that improves with every use.
The secret to cast iron performance is seasoning: a thin layer of polymerized oil that bonds to the iron surface. This seasoning protects the pan from rust, creates a slick cooking surface, and actually gets better over time as you cook with it.
Whether you are outfitting a commercial kitchen or maintaining a family heirloom skillet, this guide covers everything you need to know about seasoning, cleaning, and caring for cast iron cookware.
What Is Cast Iron Seasoning?
Seasoning is not a spice or coating you buy separately. It is a layer of polymerized fat that bonds to the iron surface through heat. When oil is heated past its smoke point in contact with iron, it undergoes a chemical change called polymerization, transforming from a liquid fat into a hard, plastic-like coating.
This seasoning layer:
- Creates a natural nonstick surface
- Protects the iron from moisture and rust
- Builds up with regular cooking, improving over time
- Can be restored if damaged
New cast iron typically comes pre-seasoned from the manufacturer, but building additional layers through cooking and maintenance creates an even better surface.
How to Season Cast Iron: Step-by-Step
Whether you are seasoning a new pan for the first time or re-seasoning an older one, the process is the same.
What You Need
- Cast iron pan
- Dish soap (for initial wash only)
- Clean, lint-free towels or paper towels
- High smoke point oil (vegetable oil, canola oil, or shortening)
- Oven
- Aluminum foil (optional, to catch drips)
Step 1: Wash the Pan
For new pans or pans that need re-seasoning, start with a thorough wash:
- Use warm water and a small amount of dish soap
- Scrub with a stiff brush to remove any factory residue, rust, or old seasoning
- Rinse completely
- Dry immediately with a clean towel
Important: After this initial wash, you will rarely need soap again for routine cleaning.
Step 2: Dry Completely
Moisture is the enemy of cast iron. After washing:
- Towel dry the entire pan, including the handle and bottom
- Place the pan on a stovetop burner over low heat for 2-3 minutes
- This evaporates any remaining moisture from pores in the iron
The pan should be completely dry and slightly warm before applying oil.
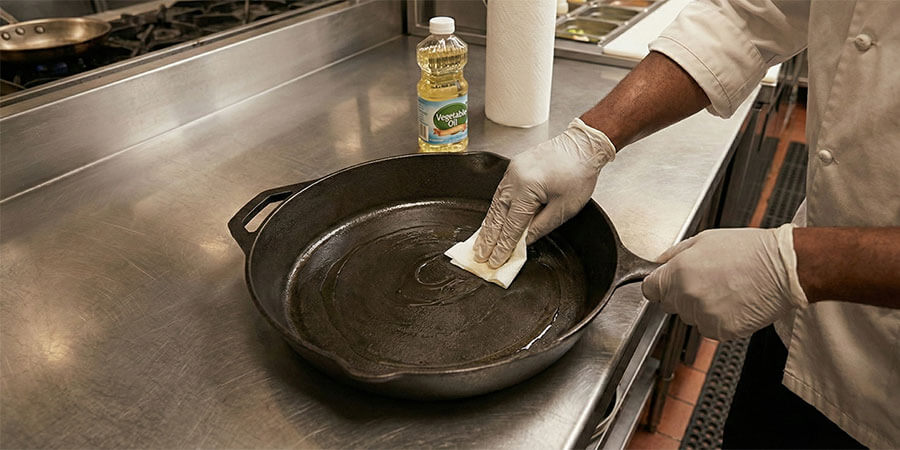
Step 3: Apply a Thin Layer of Oil
This is where most people make a mistake. More oil is not better.
- Pour a small amount of oil (about a teaspoon) onto a paper towel
- Rub the oil over the entire pan: cooking surface, sides, bottom, and handle
- Then, using a clean paper towel, wipe off as much oil as you can
- The pan should look almost dry, not shiny or wet
Why so little oil? Excess oil will not polymerize properly and will create a sticky, gummy surface instead of a hard, slick seasoning.
Step 4: Bake the Pan
- Preheat your oven to 450-500 degrees F (230-260 degrees C)
- Place the pan upside down on the middle oven rack
- Optionally, place aluminum foil on the lower rack to catch any drips
- Bake for 1 hour
- Turn off the oven and let the pan cool inside
Step 5: Repeat (Optional)
For best results, repeat the oil and bake process 2-3 times. Each layer builds a stronger, more durable seasoning. However, the pan is usable after a single round, and regular cooking will continue to build the seasoning naturally.
Best Oils for Seasoning Cast Iron
The best seasoning oils have high smoke points and are low in saturated fat. When oil exceeds its smoke point, it polymerizes into a hard coating.
Recommended Oils
| Oil | Smoke Point | Notes |
| Vegetable oil | 400-450 degrees F | Widely available, affordable, reliable results |
| Canola oil | 400 degrees F | Neutral flavor, good polymerization |
| Vegetable shortening | 360 degrees F | Traditional choice, creates durable seasoning |
| Grapeseed oil | 420 degrees F | High smoke point, thin consistency |
Oils to Avoid
- Olive oil: Low smoke point, can become sticky
- Butter: Contains milk solids that burn before polymerization
- Flaxseed oil: Often recommended online, but creates a brittle seasoning that can flake off
For commercial kitchens, vegetable oil or shortening are the most practical choices due to cost and availability.
How to Clean Cast Iron After Cooking
Daily cleaning is simple and takes only a few minutes. The goal is to remove food residue while preserving the seasoning.
The Basic Cleaning Method
- Clean while warm: It is easiest to clean cast iron when it is still warm (not hot) after cooking
- Use hot water: Rinse the pan under hot running water
- Scrub gently: Use a stiff brush or non-metal scrubber to remove food particles
- Dry immediately: Towel dry, then heat on the stove for 1-2 minutes
- Apply a light coat of oil: While the pan is still warm, rub a thin layer of oil over the cooking surface with a paper towel
Can You Use Soap on Cast Iron?
Yes, you can use soap on cast iron. This is one of the most persistent myths in cooking.
Modern dish soap is mild and will not strip properly polymerized seasoning. The old warning against soap dates back to when dish soap contained lye, which could damage seasoning. Today's dish soaps are gentle enough that occasional use will not harm your pan.
That said, soap is usually unnecessary. Hot water and a good scrub handle most cleaning tasks.
Removing Stuck-On Food
For stubborn food residue:
- Salt scrub: Pour coarse kosher salt into the warm pan and scrub with a paper towel or cloth. The salt acts as an abrasive without damaging seasoning.
- Boiling water: Add about an inch of water to the pan and bring to a boil on the stovetop. The boiling water will loosen stuck-on food. Scrape gently with a wooden or silicone spatula.
- Chain mail scrubber: For commercial kitchens, a chain mail scrubber is an effective tool for removing stuck food without damaging the pan.
After any of these methods, dry the pan completely and apply a thin coat of oil.
What NOT to Do with Cast Iron
Cast iron is durable, but certain practices will damage the seasoning or the pan itself.
Never Do These Things
- Soak in water: Extended soaking leads to rust. Clean promptly and dry immediately.
- Put in the dishwasher: The detergent and prolonged water exposure will strip seasoning and cause rust.
- Use metal utensils aggressively: While cast iron can handle metal utensils, aggressive scraping can scratch through seasoning.
- Store while wet: Always dry completely and apply a light coat of oil before storage.
- Heat an empty pan for too long: This can damage seasoning and warp the pan.
- Use glass lids that do not fit properly: Thermal shock from temperature differences can crack glass lids.
Acidic Foods and Cast Iron
Acidic foods like tomatoes, citrus, and wine can react with cast iron, especially if the seasoning is thin or new. This will not harm you, but it can:
- Create a metallic taste in food
- Strip some seasoning from the pan
For well-seasoned pans, brief cooking with acidic foods is fine. For new or freshly-seasoned pans, avoid cooking acidic foods for extended periods until the seasoning has built up.
How to Restore Rusty Cast Iron

Rust on cast iron is not the end. Even heavily rusted pans can be restored to like-new condition.
For Light Surface Rust
- Scrub the rust with steel wool or a stiff brush
- Wash with warm, soapy water
- Dry completely
- Re-season following the steps above
For Heavy Rust or Damaged Seasoning
For pans with extensive rust or flaking seasoning:
- Strip the pan: Scrub the entire pan with steel wool and soapy water, removing all rust and old seasoning down to bare metal
- Rinse and dry: Clean thoroughly and dry immediately on the stovetop
- Season from scratch: Apply 3-4 layers of seasoning following the seasoning steps above
Some people use oven cleaner or electrolysis to strip heavily damaged pans, but for most situations, elbow grease and steel wool are sufficient.
When Cast Iron Cannot Be Saved
Cast iron is remarkably durable, but some damage is irreparable:
- Cracks: A cracked pan is unsafe to use and cannot be repaired
- Warping: Pans warped from thermal shock may not sit flat on burners
- Pitting: Deep pitting from severe rust may prevent proper seasoning
Cast Iron Maintenance Schedule
For commercial kitchens and serious home cooks, following a maintenance schedule ensures your cast iron stays in top condition.
| Task | Frequency | Notes |
| Clean after cooking | Every use | Hot water, dry immediately, light oil |
| Inspect for rust spots | Weekly | Address immediately if found |
| Full re-seasoning | As needed | When food starts sticking or dull gray spots appear |
| Deep clean (salt scrub) | Monthly | Removes buildup while preserving seasoning |
| Handle and rivet inspection | Monthly | Check for looseness in commercial settings |
Frequently Asked Questions
How do you season a cast iron skillet for the first time?
Wash the pan with soap and water, dry completely, apply a very thin layer of vegetable oil over all surfaces, and bake upside down at 450 degrees F for one hour. Let the pan cool in the oven. Repeat 2-3 times for best results. After the initial seasoning, regular cooking will continue building the nonstick surface.
Can you use soap on cast iron?
Yes. Modern dish soap is safe for cast iron. Today's mild detergents will not strip properly polymerized seasoning. The old advice against soap dates back to harsh lye-based soaps that could damage seasoning. Hot water alone handles most cleaning, but occasional soap use is fine.
How do you clean a cast iron skillet after cooking?
Clean cast iron while still warm using hot water and a stiff brush. For stuck food, use a salt scrub or boil water in the pan to loosen residue. Dry immediately on the stovetop and apply a thin coat of oil before storing. Avoid soaking or putting in the dishwasher.
How often should you season cast iron?
Most cast iron needs a full oven re-seasoning only when food starts sticking consistently or you notice dull gray spots. With proper daily maintenance (drying and oiling after each use), a well-seasoned pan may go years between full re-seasonings. New pans benefit from 2-3 initial seasoning cycles.
What oil is best for seasoning cast iron?
Vegetable oil, canola oil, and vegetable shortening are the most reliable choices for seasoning. They have appropriate smoke points, are affordable, and create durable seasoning. Avoid olive oil (too low smoke point) and flaxseed oil (creates brittle seasoning that can flake).
How do you restore a rusty cast iron pan?
For light rust, scrub with steel wool, wash, dry, and re-season. For heavy rust, strip the pan completely with steel wool, removing all old seasoning down to bare metal. Then wash, dry immediately, and apply 3-4 layers of seasoning. Even severely rusted pans can usually be restored.
Why is my cast iron sticky after seasoning?
A sticky surface usually means too much oil was applied during seasoning. The excess oil did not fully polymerize. To fix this, scrub the sticky residue with hot water and a stiff brush, dry the pan, and re-season with a much thinner layer of oil. The pan should look almost dry before baking.
Can you cook acidic foods in cast iron?
You can cook acidic foods like tomatoes in well-seasoned cast iron for short periods. New or freshly-seasoned pans may develop a metallic taste or lose some seasoning when cooking acidic foods for extended periods. Once your seasoning is well-established, brief contact with acidic ingredients is not a problem.
Related Guides
- Benefits of Cast Iron Cookware - Learn why cast iron is worth the investment for commercial and home kitchens
- Commercial Cookware Buying Guide - Compare materials and select cookware for your kitchen
Shop Cast Iron and Cookware
Ready to add cast iron to your kitchen? Browse our selection:
- Frying Pans - Skillets and fry pans for commercial kitchens
- Cookware - Pots, pans, and cookware sets
- Fajita Skillets and Sizzler Platters - Cast iron serving pieces for tableside presentation
Share This!